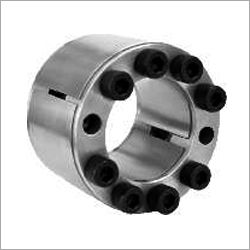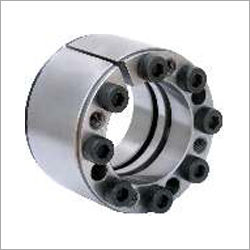

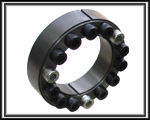
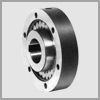
Precision Locking Assembly
Price:
Get Latest Price
In Stock
Product Specifications
| Product Type | Locking Assembly |
| Self Centering | Yes |
| Transmissible Torque | High |
| Taper Design | Wide Double |
| Runout | 0.02/0.06Mm |
| Axial Position | Fixed |
| Material | High Grade |
| Features | Easy Install, High Strength, Self Centering, High Torque, Withstand Pressure, Ruggedness |
Product Overview
Key Features
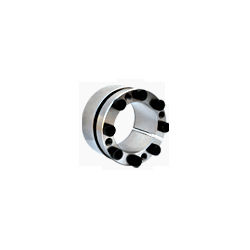
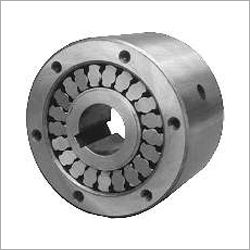
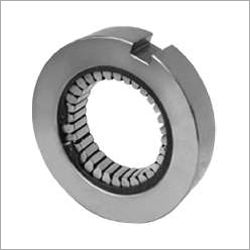
Owing to the support of our adroit professionals, we have been able to provide our clients a high quality assortment of Precision Locking Assembly that can get from us in different specifications. This assembly is widely acknowledged in various industries for fastening tools together and provides proper security. Our provided assembly is precisely manufactured by our well-versed team of professionals utilizing high grade raw material in sync with the set industry norms. We are offering this Precision Locking Assembly at an affordable price to our clients.Features: Easy to install Withstand high pressure Ruggedness High strength Specifications: Self centering. Very high transmissible torque. Wide double self releasing taper design for enhanced bending moment capacity. Runout : 0.02/0.06mm Fixed axial hub position during assembly Installation: Locking assemblies are supplied ready for installation. However, if for some reason they have to be disassembled, make sure that in addition to linedup slits in all three parts-outer ring, front & rear nut are not reversed. They are assembled correctly only if there are no holes or threads behind taps in front nut [2]. Likewise, there must be no threads behind taps in outer ring [3] as illustrated in fig. 1 & 2. The frictional torque capacity of these assemblies is based on a coefficient of friction =0.12 for slightly oiled screws, taper or shaft and bore contact areas. a) Make sure shaft and bore contact areas, screw threads, face of screw head are clean and slightly oiled. b) Loosen all screws by minimum 2turns and transfer at least 2 screws in each-in to push off threads in front nut [2] and outer ring [3] in order to disengage tapers for easy installation of locking assembly-fig.1. c) After insertion of locking assembly on to shaft/in hub, relocate locking screws used for separation of nuts. d) Hand tighten assembly & assure that nut [2] is parallel with face of part to be attached to shaft. e) Use torque wrench and set it to specified tightening torque. Tighten screws either in a clock wise or anti clockwise diametrically opposite sequence, using only turn for several passes, until No screw turn more. The screws adjacent to slit should be tighten fully last to avoid deformation in outer ring & front/rear nut. f) Still applied approx. 5% higher torque than specified tightening torque for 1 to 2 passes-required to compensate for a system related relaxation of locking screws since tightening of a screw, will always relax adjacent screw(s). g) Reset torque wrench to specified torque & check all locking screws. No screw should turn at this point, otherwise repeat step "F" for one or more time.
Company Details
Nmtg Mechtrans Techniques Pvt. Ltd., Established in 1975 at Ahmedabad in Gujarat, is a leading Exporter,Manufacturer,Supplier of Engineering Goods & Equipment in India. Nmtg Mechtrans Techniques Pvt. Ltd. is one of Trade India's verified and trusted sellers of listed products. With extensive experience in supplying and trading Precision Locking Assembly, Nmtg Mechtrans Techniques Pvt. Ltd. has made a reputed name for itself in the market with high-quality Cam Followers, Durable Locking Assembly, Durable Locking Element, etc.
Focusing on a customer-centric approach, Nmtg Mechtrans Techniques Pvt. Ltd. has a pan-India presence and caters to a huge consumer base throughout the country. Buy Engineering Goods & Equipment in bulk from Nmtg Mechtrans Techniques Pvt. Ltd. at Trade India quality-assured products.
Focusing on a customer-centric approach, Nmtg Mechtrans Techniques Pvt. Ltd. has a pan-India presence and caters to a huge consumer base throughout the country. Buy Engineering Goods & Equipment in bulk from Nmtg Mechtrans Techniques Pvt. Ltd. at Trade India quality-assured products.
Business Type
Exporter, Manufacturer, Supplier
Employee Count
30
Establishment
1975
Working Days
Monday To Sunday
GST NO
24AADCN5771B1ZQ
Certification
ISO 9001:2000
Related Products

Precision Engineered Keyless Locking Assemblies Dimension(L*W*H): 54.5 X 33 X 22 Millimeter (Mm)
Global Engineers
Ahmedabad, Gujarat

Explore Related Categories


More Product From This seller


Seller Details
GST - 24AADCN5771B1ZQ
4  Rating
RatingAhmedabad, Gujarat
Mr. Deepak Prajapati
Address
A-2, Behind GED, Near Systronic, GIDC Estate, Phase-I, Naroda, Ahmedabad, Gujarat, 382330, India
locking assembly in Ahmedabad
Report incorrect details